VMware中的Centos7扩容
记录一下虚拟机centos扩容过程,网上资料一大堆,依然踩了不少坑...
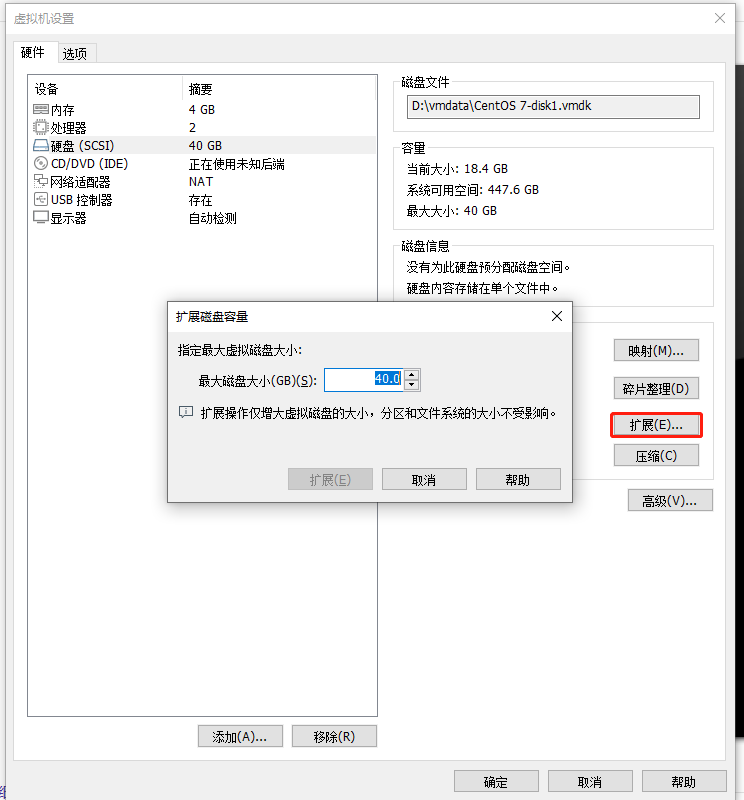
1.先关掉虚拟机,再选择虚拟机设置->硬盘->扩展,修改硬盘大小,扩容完成后会提示还需要在客户机中进行分配空间。
完成之后启动虚拟机进行下面的操作。
2.df -h查看空间,确实没有新增的磁盘空间
[root@localhost ~]# df -h
文件系统                 容量  已用  可用 已用% 挂载点
devtmpfs                 1.9G     0  1.9G    0% /dev
tmpfs                    1.9G     0  1.9G    0% /dev/shm
tmpfs                    1.9G   12M  1.9G    1% /run
tmpfs                    1.9G     0  1.9G    0% /sys/fs/cgroup
/dev/mapper/centos-root   17G   13G  4.3G   76% /
/dev/sda1               1014M  150M  865M   15% /boot
tmpfs                    378M     0  378M    0% /run/user/0
3.通过lsblk查看,sda有40G空间,证明vmware的操作已经成功。
[root@localhost ~]# lsblk
NAME            MAJ:MIN RM  SIZE RO TYPE MOUNTPOINT
sda               8:0    0   40G  0 disk
├─sda1            8:1    0    1G  0 part /boot
└─sda2            8:2    0   19G  0 part
  ├─centos-root 253:0    0   17G  0 lvm  /
  └─centos-swap 253:1    0    2G  0 lvm  [SWAP]
sr0              11:0    1 1024M  0 rom
            11:0    1 1024M  0 rom
4.执行fdisk /dev/sda,具体选项按下方执行步骤中的选项执行:
[root@localhost ~]# fdisk /dev/sda
欢迎使用 fdisk (util-linux 2.23.2)。

更改将停留在内存中,直到您决定将更改写入磁盘。
使用写入命令前请三思。

命令(输入 m 获取帮助):m
命令操作
   a   toggle a bootable flag
   b   edit bsd disklabel
   c   toggle the dos compatibility flag
   d   delete a partition
   g   create a new empty GPT partition table
   G   create an IRIX (SGI) partition table
   l   list known partition types
   m   print this menu
   n   add a new partition
   o   create a new empty DOS partition table
   p   print the partition table
   q   quit without saving changes
   s   create a new empty Sun disklabel
   t   change a partition's system id
   u   change display/entry units
   v   verify the partition table
   w   write table to disk and exit
   x   extra functionality (experts only)

命令(输入 m 获取帮助):n
Partition type:
   p   primary (2 primary, 0 extended, 2 free)
   e   extended
Select (default p): p
分区号 (3,4,默认 3):
起始 扇区 (41943040-83886079,默认为 41943040):
将使用默认值 41943040
Last 扇区, +扇区 or +size{K,M,G} (41943040-83886079,默认为 83886079):
将使用默认值 83886079
分区 3 已设置为 Linux 类型,大小设为 20 GiB

命令(输入 m 获取帮助):w
The partition table has been altered!

Calling ioctl() to re-read partition table.

WARNING: Re-reading the partition table failed with error 16: 设备或资源忙.
The kernel still uses the old table. The new table will be used at
the next reboot or after you run partprobe(8) or kpartx(8)
正在同步磁盘。
5.执行fdisk -l 查看分区状况:
 [root@localhost ~]# fdisk -l

磁盘 /dev/sda:42.9 GB, 42949672960 字节,83886080 个扇区
Units = 扇区 of 1 * 512 = 512 bytes
扇区大小(逻辑/物理):512 字节 / 512 字节
I/O 大小(最小/最佳):512 字节 / 512 字节
磁盘标签类型:dos
磁盘标识符:0x000abdbf

   设备 Boot      Start         End      Blocks   Id  System
/dev/sda1   *        2048     2099199     1048576   83  Linux
/dev/sda2         2099200    41943039    19921920   8e  Linux LVM
/dev/sda3        41943040    83886079    20971520   83  Linux

磁盘 /dev/mapper/centos-root:18.2 GB, 18249416704 字节,35643392 个扇区
Units = 扇区 of 1 * 512 = 512 bytes
扇区大小(逻辑/物理):512 字节 / 512 字节
I/O 大小(最小/最佳):512 字节 / 512 字节


磁盘 /dev/mapper/centos-swap:2147 MB, 2147483648 字节,4194304 个扇区
Units = 扇区 of 1 * 512 = 512 bytes
扇区大小(逻辑/物理):512 字节 / 512 字节
I/O 大小(最小/最佳):512 字节 / 512 字节
这里已经出现了/dev/sda3 41943040 83886079 20971520 83 Linux,证明分区成功,sda3的分区类型为Linux。
6.改分区类型类型为Linux LVM,执行fdisk /dev/sda,按如下选项进行操作即可:
[root@localhost ~]# fdisk /dev/sda
欢迎使用 fdisk (util-linux 2.23.2)。

更改将停留在内存中,直到您决定将更改写入磁盘。
使用写入命令前请三思。


命令(输入 m 获取帮助):t
分区号 (1-3,默认 3):3
Hex 代码(输入 L 列出所有代码):L

 0  空              24  NEC DOS         81  Minix / 旧 Linu bf  Solaris
 1  FAT12           27  隐藏的 NTFS Win 82  Linux 交换 / So c1  DRDOS/sec (FAT-
 2  XENIX root      39  Plan 9          83  Linux           c4  DRDOS/sec (FAT-
 3  XENIX usr       3c  PartitionMagic  84  OS/2 隐藏的 C:  c6  DRDOS/sec (FAT-
 4  FAT16 <32M      40  Venix 80286     85  Linux 扩展      c7  Syrinx
 5  扩展            41  PPC PReP Boot   86  NTFS 卷集       da  非文件系统数据
 6  FAT16           42  SFS             87  NTFS 卷集       db  CP/M / CTOS / .
 7  HPFS/NTFS/exFAT 4d  QNX4.x          88  Linux 纯文本    de  Dell 工具
 8  AIX             4e  QNX4.x 第2部分  8e  Linux LVM       df  BootIt
 9  AIX 可启动      4f  QNX4.x 第3部分  93  Amoeba          e1  DOS 访问
 a  OS/2 启动管理器 50  OnTrack DM      94  Amoeba BBT      e3  DOS R/O
 b  W95 FAT32       51  OnTrack DM6 Aux 9f  BSD/OS          e4  SpeedStor
 c  W95 FAT32 (LBA) 52  CP/M            a0  IBM Thinkpad 休 eb  BeOS fs
 e  W95 FAT16 (LBA) 53  OnTrack DM6 Aux a5  FreeBSD         ee  GPT
 f  W95 扩展 (LBA)  54  OnTrackDM6      a6  OpenBSD         ef  EFI (FAT-12/16/
10  OPUS            55  EZ-Drive        a7  NeXTSTEP        f0  Linux/PA-RISC
11  隐藏的 FAT12    56  Golden Bow      a8  Darwin UFS      f1  SpeedStor
12  Compaq 诊断     5c  Priam Edisk     a9  NetBSD          f4  SpeedStor
14  隐藏的 FAT16 <3 61  SpeedStor       ab  Darwin 启动     f2  DOS 次要
16  隐藏的 FAT16    63  GNU HURD or Sys af  HFS / HFS+      fb  VMware VMFS
17  隐藏的 HPFS/NTF 64  Novell Netware  b7  BSDI fs         fc  VMware VMKCORE
18  AST 智能睡眠    65  Novell Netware  b8  BSDI swap       fd  Linux raid 自动
1b  隐藏的 W95 FAT3 70  DiskSecure 多启 bb  Boot Wizard 隐  fe  LANstep
1c  隐藏的 W95 FAT3 75  PC/IX           be  Solaris 启动    ff  BBT
1e  隐藏的 W95 FAT1 80  旧 Minix
Hex 代码(输入 L 列出所有代码):8e
已将分区“Linux”的类型更改为“Linux LVM”

命令(输入 m 获取帮助):w
The partition table has been altered!

Calling ioctl() to re-read partition table.

WARNING: Re-reading the partition table failed with error 16: 设备或资源忙.
The kernel still uses the old table. The new table will be used at
the next reboot or after you run partprobe(8) or kpartx(8)
正在同步磁盘。
7.执行mkfs.ext4 /dev/sda3,更改磁盘类型
[root@localhost ~]# mkfs.ext4 /dev/sda3
mke2fs 1.42.9 (28-Dec-2013)
无法对 /dev/sda3 进行 stat 调用 --- 没有那个文件或目录

The device apparently does not exist; did you specify it correctly?
这一步就出现了幺蛾子,说是找不到/dev/sda3。 通过ls /dev查看,确实没有sda3,只有sda、sda1和sda3。
[root@localhost ~]# ls /dev
agpgart        centos           disk  fuse       kmsg          net                 ppp     rtc0  snapshot  tty0   tty15  tty21  tty28  tty34  tty40  tty47  tty53  tty6   tty9    urandom  vcs3   vcsa3        vhost-net
autofs         char             dm-0  hidraw0    log           network_latency     ptmx    sda   snd       tty1   tty16  tty22  tty29  tty35  tty41  tty48  tty54  tty60  ttyS0   usbmon0  vcs4   vcsa4        vmci
block          console          dm-1  hpet       loop-control  network_throughput  pts     sda1  sr0       tty10  tty17  tty23  tty3   tty36  tty42  tty49  tty55  tty61  ttyS1   usbmon1  vcs5   vcsa5        vsock
bsg            core             dri   hugepages  mapper        null                random  sda2  stderr    tty11  tty18  tty24  tty30  tty37  tty43  tty5   tty56  tty62  ttyS2   usbmon2  vcs6   vcsa6        zero
btrfs-control  cpu              fb0   hwrng      mcelog        nvram               raw     sg0   stdin     tty12  tty19  tty25  tty31  tty38  tty44  tty50  tty57  tty63  ttyS3   vcs      vcsa   vfio
bus            cpu_dma_latency  fd    initctl    mem           oldmem              rfkill  sg1   stdout    tty13  tty2   tty26  tty32  tty39  tty45  tty51  tty58  tty7   uhid    vcs1     vcsa1  vga_arbiter
cdrom          crash            full  input      mqueue        port                rtc     shm   tty       tty14  tty20  tty27  tty33  tty4   tty46  tty52  tty59  tty8   uinput  vcs2     vcsa2  vhci
8.这一步很关键,解决找不到/dev/sda3的问题。执行partprobe。
[root@localhost ~]# partprobe
执行完成后再次执行ls /dev,我们看到sda3已经有了。
[root@localhost ~]# ls /dev
agpgart        centos           disk  fuse       kmsg          net                 ppp     rtc0  shm       tty    tty14  tty20  tty27  tty33  tty4   tty46  tty52  tty59  tty8   uinput   vcs2   vcsa2        vhci
autofs         char             dm-0  hidraw0    log           network_latency     ptmx    sda   snapshot  tty0   tty15  tty21  tty28  tty34  tty40  tty47  tty53  tty6   tty9   urandom  vcs3   vcsa3        vhost-net
block          console          dm-1  hpet       loop-control  network_throughput  pts     sda1  snd       tty1   tty16  tty22  tty29  tty35  tty41  tty48  tty54  tty60  ttyS0  usbmon0  vcs4   vcsa4        vmci
bsg            core             dri   hugepages  mapper        null                random  sda2  sr0       tty10  tty17  tty23  tty3   tty36  tty42  tty49  tty55  tty61  ttyS1  usbmon1  vcs5   vcsa5        vsock
btrfs-control  cpu              fb0   hwrng      mcelog        nvram               raw     sda3  stderr    tty11  tty18  tty24  tty30  tty37  tty43  tty5   tty56  tty62  ttyS2  usbmon2  vcs6   vcsa6        zero
bus            cpu_dma_latency  fd    initctl    mem           oldmem              rfkill  sg0   stdin     tty12  tty19  tty25  tty31  tty38  tty44  tty50  tty57  tty63  ttyS3  vcs      vcsa   vfio
cdrom          crash            full  input      mqueue        port                rtc     sg1   stdout    tty13  tty2   tty26  tty32  tty39  tty45  tty51  tty58  tty7   uhid   vcs1     vcsa1  vga_arbiter
9.重新执行一次mkfs.ext4 /dev/sda3。
[root@localhost ~]# mkfs.ext4 /dev/sda3
mke2fs 1.42.9 (28-Dec-2013)
文件系统标签=
OS type: Linux
块大小=4096 (log=2)
分块大小=4096 (log=2)
Stride=0 blocks, Stripe width=0 blocks
1310720 inodes, 5242880 blocks
262144 blocks (5.00%) reserved for the super user
第一个数据块=0
Maximum filesystem blocks=2153775104
160 block groups
32768 blocks per group, 32768 fragments per group
8192 inodes per group
Superblock backups stored on blocks:
        32768, 98304, 163840, 229376, 294912, 819200, 884736, 1605632, 2654208,
        4096000

Allocating group tables: 完成
正在写入inode表: 完成
Creating journal (32768 blocks): 完成
Writing superblocks and filesystem accounting information: 完成
10.执行pvcreate /dev/sda3。
[root@localhost ~]# pvcreate /dev/sda3
WARNING: ext4 signature detected on /dev/sda3 at offset 1080. Wipe it? [y/n]: y
  Wiping ext4 signature on /dev/sda3.
  Physical volume "/dev/sda3" successfully created.
[root@localhost ~]# pvdisplay
  --- Physical volume ---
  PV Name               /dev/sda2
  VG Name               centos
  PV Size               <19.00 GiB / not usable 3.00 MiB
  Allocatable           yes (but full)
  PE Size               4.00 MiB
  Total PE              4863
  Free PE               0
  Allocated PE          4863
  PV UUID               Go5BK8-Mmb5-xE7c-Fije-vmL0-jlKP-qckS7U

  "/dev/sda3" is a new physical volume of "20.00 GiB"
  --- NEW Physical volume ---
  PV Name               /dev/sda3
  VG Name
  PV Size               20.00 GiB
  Allocatable           NO
  PE Size               0
  Total PE              0
  Free PE               0
  Allocated PE          0
  PV UUID               q3Ff5q-qEGa-xAco-kzuO-8xzI-VB6l-fQKkDG
11.执行vgextend centos /dev/sda3。
[root@localhost ~]# vgextend centos /dev/sda3
  Volume group "centos" successfully extended
12.执行lvextend -L +20G /dev/mapper/centos-root。
[root@localhost ~]# lvextend -L +20G /dev/mapper/centos-root
  Insufficient free space: 5120 extents needed, but only 5119 available
13.出错了,说扩展需要5120,单是只有5119,我们将空间改小一点,执行lvextend -L +19.9G /dev/mapper/centos-root。
[root@localhost ~]# lvextend -L +19.9G /dev/mapper/centos-root
  Rounding size to boundary between physical extents: 19.90 GiB.
  Size of logical volume centos/root changed from <17.00 GiB (4351 extents) to <36.90 GiB (9446 extents).
  Logical volume centos/root successfully resized.
14.执行xfs_growfs /dev/mapper/centos-root。
[root@localhost ~]# xfs_growfs /dev/mapper/centos-root
meta-data=/dev/mapper/centos-root isize=512    agcount=4, agsize=1113856 blks
         =                       sectsz=512   attr=2, projid32bit=1
         =                       crc=1        finobt=0 spinodes=0
data     =                       bsize=4096   blocks=4455424, imaxpct=25
         =                       sunit=0      swidth=0 blks
naming   =version 2              bsize=4096   ascii-ci=0 ftype=1
log      =internal               bsize=4096   blocks=2560, version=2
         =                       sectsz=512   sunit=0 blks, lazy-count=1
realtime =none                   extsz=4096   blocks=0, rtextents=0
data blocks changed from 4455424 to 9672704
至此已经扩成功了,执行df -h,扩容的空间已经有了。如果空间没有增加重启一下再查看。
[root@localhost ~]# df -h
文件系统                 容量  已用  可用 已用% 挂载点
devtmpfs                 1.9G     0  1.9G    0% /dev
tmpfs                    1.9G     0  1.9G    0% /dev/shm
tmpfs                    1.9G   12M  1.9G    1% /run
tmpfs                    1.9G     0  1.9G    0% /sys/fs/cgroup
/dev/mapper/centos-root   37G   13G   25G   35% /
/dev/sda1               1014M  150M  865M   15% /boot
tmpfs                    378M     0  378M    0% /run/user/0