windows下搭建以太坊联盟链(POA共识)
网上的教程很多,但大都是2018、2019年的,很多命令行都已经过期,本文使用最新版geth(v1.10.16)搭建基于POA共识的联盟链,详细展示了每一步操作和返回结果以及操作可能发生的错误,展示了出现错误解决错误的详细步骤。
1. geth下载及安装
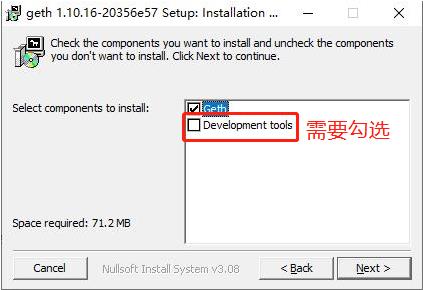
进入官网下载最新版的geth客户端,下载完成后进行安装即可,安装过程中有两点需要注意:
需要勾选Development tools选项,否则安装完成后没有puppeth、bootnode等工具,如下:
安装完成后如果出现
Addtopath: original length 2916>1024...提示需要手动将geth安装目录添加到环境变量,我安装在e:\Geth,如下: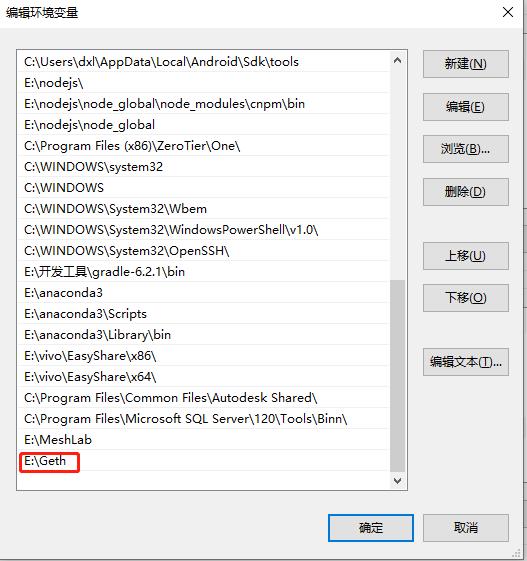
安装完成后的安装目录如下: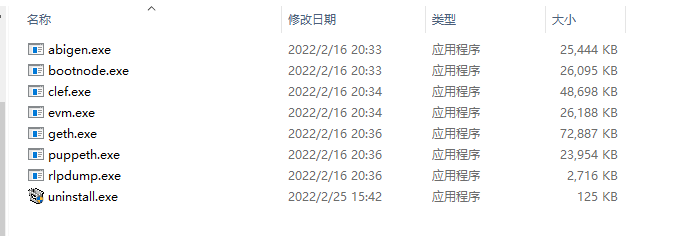
如果只有geth.exe和uninstall.exe两个文件就是安装过程中没有勾选Development tools,请卸载重新安装。
打开cmd,输入geth -h验证环境变量配置是否正确,出现以下提示则代表成功:
C:\Users\dxl>geth -h
NAME:
   geth - the go-ethereum command line interface

   Copyright 2013-2021 The go-ethereum Authors

USAGE:
   geth [options] [command] [command options] [arguments...]

VERSION:
   1.10.16-stable-20356e57

COMMANDS:
   account                            Manage accounts
   attach                             Start an interactive JavaScript environment (connect to node)
   console                            Start an interactive JavaScript environment
·
·
·
2. 创建联盟链节点
2.1 创建用户
接下来我们先创建三个区块链数据的存储目录用来存储联盟链各个节点的数据,我创建的目录分别如下:
- E:\blockchain\node1
- E:\blockchain\node2
- E:\blockchain\node3
接下来我们为三个节点分别创建一个账号,分别进入三个目录执行geth --datadir ./data account new,按照提示输入两次密码即可,此密码是新建账户的密码,需要记住,创建完成后会告诉你新建的用户地址,也需要进行记录,具体操作和操作结果如下:
PS E:\blockchain\node1> geth --datadir ./data account new
INFO [02-25|16:00:46.013] Maximum peer count                       ETH=50 LES=0 total=50
Your new account is locked with a password. Please give a password. Do not forget this password.
Password:
Repeat password:

Your new key was generated

Public address of the key:   0x7FDfD0Bb4b9CA3D8DffB624FA6B457131C86E91D
Path of the secret key file: data\keystore\UTC--2022-02-25T08-00-54.921088100Z--7fdfd0bb4b9ca3d8dffb624fa6b457131c86e91d

- You can share your public address with anyone. Others need it to interact with you.
- You must NEVER share the secret key with anyone! The key controls access to your funds!
- You must BACKUP your key file! Without the key, it's impossible to access account funds!
- You must REMEMBER your password! Without the password, it's impossible to decrypt the key!

E:\blockchain\node1> cd ../node2
PS E:\blockchain\node2> geth --datadir ./data account new
INFO [02-25|16:01:19.376] Maximum peer count                       ETH=50 LES=0 total=50
Your new account is locked with a password. Please give a password. Do not forget this password.
Password:
Repeat password:

Your new key was generated

Public address of the key:   0x87f0bDf019B52CafCfC6f5932d8E75ea62838A26
Path of the secret key file: data\keystore\UTC--2022-02-25T08-01-25.688949500Z--87f0bdf019b52cafcfc6f5932d8e75ea62838a26

- You can share your public address with anyone. Others need it to interact with you.
- You must NEVER share the secret key with anyone! The key controls access to your funds!
- You must BACKUP your key file! Without the key, it's impossible to access account funds!
- You must REMEMBER your password! Without the password, it's impossible to decrypt the key!

PS E:\blockchain\node2> cd ../node3
PS E:\blockchain\node3> geth --datadir ./data account new
INFO [02-25|16:01:42.067] Maximum peer count                       ETH=50 LES=0 total=50
Your new account is locked with a password. Please give a password. Do not forget this password.
Password:
Repeat password:

Your new key was generated

Public address of the key:   0x42D61e97B45A64E7e55164279b8152b9Cc9D75D6
Path of the secret key file: data\keystore\UTC--2022-02-25T08-01-47.929103600Z--42d61e97b45a64e7e55164279b8152b9cc9d75d6

- You can share your public address with anyone. Others need it to interact with you.
- You must NEVER share the secret key with anyone! The key controls access to your funds!
- You must BACKUP your key file! Without the key, it's impossible to access account funds!
- You must REMEMBER your password! Without the password, it's impossible to decrypt the key!
2.2 生成创世区块配置文件
网上大多数教程都直接贴一个配置文件上来让大家直接粘过去用,有时候会因版本不一致等问题报错,我们利用puppeth命令来一步步生成创世区块配置文件,这样不会出现问题,在命令行窗口直接执行puppeth,一步步按要求输入选项即可,具体输入和输出如下:
PS E:\blockchain\node1> puppeth
+-----------------------------------------------------------+
| Welcome to puppeth, your Ethereum private network manager |
| |
| This tool lets you create a new Ethereum network down to |
| the genesis block, bootnodes, miners and ethstats servers |
| without the hassle that it would normally entail. |
| |
| Puppeth uses SSH to dial in to remote servers, and builds |
| its network components out of Docker containers using the |
| docker-compose toolset. |
+-----------------------------------------------------------+
Please specify a network name to administer (no spaces, hyphens or capital letters please) //网络名称,最后生成的json文件就是这个名字
> chainnet
Sweet, you can set this via --network=chainnet next time!
[32mINFO [0m[02-25|16:08:12.631] Administering Ethereum network [32mname[0m=chainnet
[33mWARN [0m[02-25|16:08:12.650] No previous configurations found [33mpath[0m=.puppeth\chainnet
What would you like to do? (default = stats)
1. Show network stats
2. Configure new genesis //配置新的创世
3. Track new remote server
4. Deploy network components
> 2
What would you like to do? (default = create)
1. Create new genesis from scratch //从头开始创建新的创世
2. Import already existing genesis
> 1
Which consensus engine to use? (default = clique)
1. Ethash - proof-of-work //POW共识机制
2. Clique - proof-of-authority //POA共识机制
> 2
How many seconds should blocks take? (default = 15) //输入出块速度,这里我设置了0秒,此处很重要0秒代表有交易才会出块
> 0
Which accounts are allowed to seal? (mandatory at least one) //设置哪些账户允许签名,输入我们最开始创建的三个账户户即可
> 0x7FDfD0Bb4b9CA3D8DffB624FA6B457131C86E91D
> 0x87f0bDf019B52CafCfC6f5932d8E75ea62838A26
> 0x42D61e97B45A64E7e55164279b8152b9Cc9D75D6
> 0x
Which accounts should be pre-funded? (advisable at least one) //设置哪些账户具有初始余额,可设置可不设置
> 0x7FDfD0Bb4b9CA3D8DffB624FA6B457131C86E91D
> 0x
Should the precompile-addresses (0x1 .. 0xff) be pre-funded with 1 wei? (advisable yes)
> y
Specify your chain/network ID if you want an explicit one (default = random) //网络id随便输个,记住就行
> 1258
[32mINFO [0m[02-25|16:11:43.498] Configured new genesis block
What would you like to do? (default = stats)
1. Show network stats
2. Manage existing genesis //管理已存在的创世配置
3. Track new remote server
4. Deploy network components
> 2
1. Modify existing configurations
2. Export genesis configurations 导出
3. Remove genesis configuration
> 2
Which folder to save the genesis specs into? (default = current) //导出路径,默认当前,也可以自己设置,执行完这一步,文件就已经创建好了
Will create chainnet.json, chainnet-aleth.json, chainnet-harmony.json, chainnet-parity.json
>
[32mINFO [0m[02-25|16:13:29.397] Saved native genesis chain spec [32mpath[0m=chainnet.json
[31mERROR[0m[02-25|16:13:29.397] Failed to create Aleth chain spec [31merr[0m="unsupported consensus engine"
[31mERROR[0m[02-25|16:13:29.398] Failed to create Parity chain spec [31merr[0m="unsupported consensus engine"
[32mINFO [0m[02-25|16:13:29.402] Saved genesis chain spec [32mclient[0m=harmony [32mpath[0m=chainnet-harmony.json
What would you like to do? (default = stats)
1. Show network stats
2. Manage existing genesis
3. Track new remote server
4. Deploy network components
生成的文件如下,我再第一步中输入的名字是chainnet,所以此处生成的文件就是chainnet.json:
接下来我们看看生成好的配置文件(chainnet.json),alloc里面会有好多0x0000···的账户和上面设置的有余额的账户,接下来我们做两个操作:
1)删除那些0x0000000···的账户
2)如果想要设置初始余额可以把账户及余额配置到alloc中
最终修改好的chainnet.json如下,大家可以参照:
 {
  "config": {
    "chainId": 1258,
    "homesteadBlock": 0,
    "eip150Block": 0,
    "eip150Hash": "0x0000000000000000000000000000000000000000000000000000000000000000",
    "eip155Block": 0,
    "eip158Block": 0,
    "byzantiumBlock": 0,
    "constantinopleBlock": 0,
    "petersburgBlock": 0,
    "istanbulBlock": 0,
    "clique": {
      "period": 3,
      "epoch": 30000
    }
  },
  "nonce": "0x0",
  "timestamp": "0x62188e72",
  "extraData": "0x000000000000000000000000000000000000000000000000000000000000000042d61e97b45a64e7e55164279b8152b9cc9d75d67fdfd0bb4b9ca3d8dffb624fa6b457131c86e91d87f0bdf019b52cafcfc6f5932d8e75ea62838a260000000000000000000000000000000000000000000000000000000000000000000000000000000000000000000000000000000000000000000000000000000000",
  "gasLimit": "0x47b760",
  "difficulty": "0x1",
  "mixHash": "0x0000000000000000000000000000000000000000000000000000000000000000",
  "coinbase": "0x0000000000000000000000000000000000000000",
  "alloc": {
    "87f0bDf019B52CafCfC6f5932d8E75ea62838A26": {
      "balance": "0x1"
    },
    "42D61e97B45A64E7e55164279b8152b9Cc9D75D6": {
      "balance": "0x1"
    },
    "7fdfd0bb4b9ca3d8dffb624fa6b457131c86e91d": {
      "balance": "0x200000000000000000000000000000000000000000000000000000000000000"
    }
  },
  "number": "0x0",
  "gasUsed": "0x0",
  "parentHash": "0x0000000000000000000000000000000000000000000000000000000000000000",
  "baseFeePerGas": null
}
其中POA共识配置是:
"clique": {
      "period": 0,
      "epoch": 30000
    }
如果没有此配置,则使用的是POW共识。再次划重点:
以太坊POA共识联盟链如何设置有交易才出块(产生新区块)? 答案就是将此处的period(出块时间)设置为0。
2.3 初始化节点
接下来分别进入三个目录执行geth --datadir ./data init chainnet.json,具体操作及返回结果如下:
PS E:\blockchain\node1> geth --datadir ./data init chainnet.json
INFO [02-25|16:25:39.627] Maximum peer count                       ETH=50 LES=0 total=50
INFO [02-25|16:25:39.651] Set global gas cap                       cap=50,000,000
INFO [02-25|16:25:39.655] Allocated cache and file handles         database=E:\blockchain\node1\data\geth\chaindata cache=16.00MiB handles=16
INFO [02-25|16:25:40.170] Writing custom genesis block
INFO [02-25|16:25:40.175] Persisted trie from memory database      nodes=4 size=593.00B time="635.3µs" gcnodes=0 gcsize=0.00B gctime=0s livenodes=1 livesize=0.00B
INFO [02-25|16:25:40.184] Successfully wrote genesis state         database=chaindata                               hash=4c3b32..f2e059
INFO [02-25|16:25:40.193] Allocated cache and file handles         database=E:\blockchain\node1\data\geth\lightchaindata cache=16.00MiB handles=16
INFO [02-25|16:25:40.270] Writing custom genesis block
INFO [02-25|16:25:40.274] Persisted trie from memory database      nodes=4 size=593.00B time="45.6µs"  gcnodes=0 gcsize=0.00B gctime=0s livenodes=1 livesize=0.00B
INFO [02-25|16:25:40.281] Successfully wrote genesis state         database=lightchaindata                          hash=4c3b32..f2e059
PS E:\blockchain\node1> cd ../node2
PS E:\blockchain\node2> geth --datadir ./data init chainnet.json
INFO [02-25|16:26:18.200] Maximum peer count                       ETH=50 LES=0 total=50
INFO [02-25|16:26:18.224] Set global gas cap                       cap=50,000,000
INFO [02-25|16:26:18.228] Allocated cache and file handles         database=E:\blockchain\node2\data\geth\chaindata cache=16.00MiB handles=16
INFO [02-25|16:26:18.326] Writing custom genesis block
INFO [02-25|16:26:18.329] Persisted trie from memory database      nodes=4 size=593.00B time=0s gcnodes=0 gcsize=0.00B gctime=0s livenodes=1 livesize=0.00B
INFO [02-25|16:26:18.339] Successfully wrote genesis state         database=chaindata                               hash=4c3b32..f2e059
INFO [02-25|16:26:18.344] Allocated cache and file handles         database=E:\blockchain\node2\data\geth\lightchaindata cache=16.00MiB handles=16
INFO [02-25|16:26:18.415] Writing custom genesis block
INFO [02-25|16:26:18.420] Persisted trie from memory database      nodes=4 size=593.00B time="527.1µs" gcnodes=0 gcsize=0.00B gctime=0s livenodes=1 livesize=0.00B
INFO [02-25|16:26:18.428] Successfully wrote genesis state         database=lightchaindata                          hash=4c3b32..f2e059
PS E:\blockchain\node2> cd ../node3
PS E:\blockchain\node3> geth --datadir ./data init chainnet.json
INFO [02-25|16:26:36.079] Maximum peer count                       ETH=50 LES=0 total=50
INFO [02-25|16:26:36.104] Set global gas cap                       cap=50,000,000
INFO [02-25|16:26:36.108] Allocated cache and file handles         database=E:\blockchain\node3\data\geth\chaindata cache=16.00MiB handles=16
INFO [02-25|16:26:36.205] Writing custom genesis block
INFO [02-25|16:26:36.211] Persisted trie from memory database      nodes=4 size=593.00B time="521.1µs" gcnodes=0 gcsize=0.00B gctime=0s livenodes=1 livesize=0.00B
INFO [02-25|16:26:36.219] Successfully wrote genesis state         database=chaindata                               hash=4c3b32..f2e059
INFO [02-25|16:26:36.227] Allocated cache and file handles         database=E:\blockchain\node3\data\geth\lightchaindata cache=16.00MiB handles=16
INFO [02-25|16:26:36.305] Writing custom genesis block
INFO [02-25|16:26:36.308] Persisted trie from memory database      nodes=4 size=593.00B time="531µs"   gcnodes=0 gcsize=0.00B gctime=0s livenodes=1 livesize=0.00B
INFO [02-25|16:26:36.319] Successfully wrote genesis state         database=lightchaindata                          hash=4c3b32..f2e059
2.4 启动节点
接下来我们分别启动三个节点,因为在同一个机器上启动,ip相同,所以选择了三个不同的端口,以下命令行是最新的,网上的一些教程中使用了--rpc、--rpcport之类的参数,这些参数在最新版中已经被移除,所以无法执行,请用下面的命令行启动。以下命令需要记住,以后每次启动都用相同的命令。
在第一个节点上执行
geth --datadir ./data --networkid 1258 --port 30303 --http --http.port 8545 --http.api personal,eth,net,web3 --http.corsdomain "*" --syncmode "full" --nodiscover console
返回结果如下:
PS E:\blockchain\node1> geth --datadir ./data --networkid 1258 --port 30303 --http --http.port 8545 --http.api personal,eth,net,web3 --http.corsdomain "*" --syncmode "full" --nodiscover  console
INFO [02-25|16:36:13.861] Maximum peer count                       ETH=50 LES=0 total=50
INFO [02-25|16:36:13.883] Set global gas cap                       cap=50,000,000
INFO [02-25|16:36:13.887] Allocated trie memory caches             clean=154.00MiB dirty=256.00MiB
INFO [02-25|16:36:13.895] Allocated cache and file handles         database=E:\blockchain\node1\data\geth\chaindata cache=512.00MiB handles=8192
INFO [02-25|16:36:14.572] Opened ancient database                  database=E:\blockchain\node1\data\geth\chaindata\ancient readonly=false
INFO [02-25|16:36:14.581] Initialised chain configuration          config="{ChainID: 1258 Homestead: 0 DAO: <nil> DAOSupport: false EIP150: 0 EIP155: 0 EIP158: 0 Byzantium: 0 Constantinople: 0 Petersburg: 0 Istanbul: 0, Muir Glacier: <nil>, Berlin: <nil>, London: <nil>, Arrow Glacier: <nil>, MergeFork: <nil>, Engine: clique}"
INFO [02-25|16:36:14.603] Initialising Ethereum protocol           network=1258 dbversion=<nil>
INFO [02-25|16:36:14.608] Loaded most recent local header          number=0 hash=4c3b32..f2e059 td=1 age=27m56s
INFO [02-25|16:36:14.617] Loaded most recent local full block      number=0 hash=4c3b32..f2e059 td=1 age=27m56s
INFO [02-25|16:36:14.624] Loaded most recent local fast block      number=0 hash=4c3b32..f2e059 td=1 age=27m56s
WARN [02-25|16:36:14.635] Failed to load snapshot, regenerating    err="missing or corrupted snapshot"
INFO [02-25|16:36:14.641] Rebuilding state snapshot
INFO [02-25|16:36:14.645] Resuming state snapshot generation       root=a39bd9..297ddd accounts=0 slots=0 storage=0.00B elapsed=0s
INFO [02-25|16:36:14.646] Regenerated local transaction journal    transactions=0 accounts=0
INFO [02-25|16:36:14.653] Generated state snapshot                 accounts=3 slots=0 storage=146.00B elapsed=7.554ms
INFO [02-25|16:36:14.661] Stored checkpoint snapshot to disk       number=0 hash=4c3b32..f2e059
INFO [02-25|16:36:14.674] Gasprice oracle is ignoring threshold set threshold=2
WARN [02-25|16:36:14.679] Error reading unclean shutdown markers   error="leveldb: not found"
INFO [02-25|16:36:14.687] Starting peer-to-peer node               instance=Geth/v1.10.16-stable-20356e57/windows-amd64/go1.17.5
INFO [02-25|16:36:14.828] New local node record                    seq=1,645,778,174,827 id=3204fa9dc24416d4 ip=127.0.0.1 udp=0 tcp=30303
INFO [02-25|16:36:14.829] IPC endpoint opened                      url=\\.\pipe\geth.ipc
INFO [02-25|16:36:14.836] Started P2P networking                   self="enode://6779b9fc0d8e6253b31a69d206a61f55ec9cb56cdfd1d01446225cc12d58e78809006fe78fa7f60c69a931d084482cded7c2922e1ee6cc790a0c40f69885fdfe@127.0.0.1:30303?discport=0"
INFO [02-25|16:36:14.845] HTTP server started                      endpoint=127.0.0.1:8545 prefix= cors=* vhosts=localhost
INFO [02-25|16:36:14.905] Etherbase automatically configured       address=0x7FDfD0Bb4b9CA3D8DffB624FA6B457131C86E91D
Welcome to the Geth JavaScript console!

instance: Geth/v1.10.16-stable-20356e57/windows-amd64/go1.17.5
coinbase: 0x7fdfd0bb4b9ca3d8dffb624fa6b457131c86e91d
at block: 0 (Fri Feb 25 2022 16:08:18 GMT+0800 (CST))
 datadir: E:\blockchain\node1\data
 modules: admin:1.0 clique:1.0 debug:1.0 eth:1.0 miner:1.0 net:1.0 personal:1.0 rpc:1.0 txpool:1.0 web3:1.0

To exit, press ctrl-d or type exit
>
成功进入控制台证明连接成功。
第二个节点和第三个节点的命令行稍有不同,增加了--ipcdisable参数,禁用ipc,否则无法启动
在第二个节点上执行:
geth --datadir ./data --networkid 1258 --port 30304 --http --http.port 8546 --http.api personal,eth,net,web3 --http.corsdomain "*" --syncmode "full" --nodiscover --ipcdisable console
在第三个节点上执行:
geth --datadir ./data --networkid 1258 --port 30305 --http --http.port 8547 --http.api personal,eth,net,web3 --http.corsdomain "*" --syncmode "full" --nodiscover --ipcdisable console
至此三个节点已经启动成功。
3. 打通联盟链各个节点
目前的三个节点都是独立运行的,各个节点没有连接起来,接下来我们将三个节点连接在一起。
3.1 手动添加节点
我们先在第一个节点上执行admin.peers:
> admin.peers
[]
可以看出目前确实没有其他节点的信息。
接下来我们需要分别获取三个节点的enode信息,首先在第一个节点上执行admin.nodeInfo.enode,查看节点的enode信息:
> admin.nodeInfo.enode
"enode://6779b9fc0d8e6253b31a69d206a61f55ec9cb56cdfd1d01446225cc12d58e78809006fe78fa7f60c69a931d084482cded7c2922e1ee6cc790a0c40f69885fdfe@127.0.0.1:30303?discport=0"
第二个节点执行admin.nodeInfo.enode:
> admin.nodeInfo.enode
"enode://f1e9b03d491338338233755c5a6e65c35c5005b17e0d2edcd910b3bc306f4ea42e0a8a1ae03461bfada67d4e551d88095333f1245bc336e5d27f8e99d03276e8@127.0.0.1:30304?discport=0"
第三个节点执行admin.nodeInfo.enode:
> admin.nodeInfo.enode
"enode://5ed1c1c554bd27b3cf31f852d51b9030727768401edf2a8179ef12604377e25e73b1c4b3855686535abf806b3fae0f0108cfc7f59e45508e99da739fa0719ab6@127.0.0.1:30305?discport=0"
接着把第二个节点和第三个节点加入到第一个节点上,在第一个节点上通过admin.addPeer("enode信息")命令将第二、第三个节点加入,enode信息分别替换成上面通过admin.nodeInfo.enode查询的结果,具体操作如下:
> admin.addPeer("enode://f1e9b03d491338338233755c5a6e65c35c5005b17e0d2edcd910b3bc306f4ea42e0a8a1ae03461bfada67d4e551d88095333f1245bc336e5d27f8e99d03276e8@127.0.0.1:30304?discport=0")

INFtOr ue[02
-> 25|16:54:22.915] Looking for peers                        peercount=0 tried=0 static=1
INFO [02-25|16:54:57.930] Looking for peers                        peercount=1 tried=1 static=1

> admin.addPeer("enode://5ed1c1c554bd27b3cf31f852d51b9030727768401edf2a8179ef12604377e25e73b1c4b3855686535abf806b3fae0f0108cfc7f59e45508e99da739fa0719ab6@127.0.0.1:30305?discport=0")
trueINF
O > [02-25|16:56:31.527] Looking for peers                        peercount=1 tried=0 static=2

>
此时第一个节点中已经和第二第三个节点连接起来了,截至二我们再将第三个节点和第二个节点连接起来,在第二个节点上执行admin.addPeer("第三个节点enode信息"),操作如下:
> admin.addPeer("enode://5ed1c1c554bd27b3cf31f852d51b9030727768401edf2a8179ef12604377e25e73b1c4b3855686535abf806b3fae0f0108cfc7f59e45508e99da739fa0719ab6@127.0.0.1:30305?discport=0")
INtrueFO
[0> 2-25|16:59:03.549] Looking for peers                        peercount=1 tried=0 static=1
至此三个节点已经打通,联盟链已经建立完成,我们通过admin.peers命令来进行验证,在第一个节点上执行结果如下:
> admin.peers
[{
    caps: ["eth/66", "snap/1"],
    enode: "enode://f1e9b03d491338338233755c5a6e65c35c5005b17e0d2edcd910b3bc306f4ea42e0a8a1ae03461bfada67d4e551d88095333f1245bc336e5d27f8e99d03276e8@127.0.0.1:30304?discport=0",
    id: "4dd058fee6a95b37351f7228a3a445198edcc4257a7268b027d0bade735795ef",
    name: "Geth/v1.10.16-stable-20356e57/windows-amd64/go1.17.5",
    network: {
      inbound: false,
      localAddress: "127.0.0.1:51150",
      remoteAddress: "127.0.0.1:30304",
      static: true,
      trusted: false
    },
    protocols: {
      eth: {
        difficulty: 81,
        head: "0x1ec65dff0ef76ff041dfb488472391fec1eba1b0d46d2729a48eb9ef4e2eb488",
        version: 66
      },
      snap: {
        version: 1
      }
    }
}, {
    caps: ["eth/66", "snap/1"],
    enode: "enode://5ed1c1c554bd27b3cf31f852d51b9030727768401edf2a8179ef12604377e25e73b1c4b3855686535abf806b3fae0f0108cfc7f59e45508e99da739fa0719ab6@127.0.0.1:56673",
    id: "f8f13e8cb7e2a564df7dc53da2c76bfb56f5ab064a1b39af2aa2c63886ae3a00",
    name: "Geth/v1.10.16-stable-20356e57/windows-amd64/go1.17.5",
    network: {
      inbound: true,
      localAddress: "127.0.0.1:30303",
      remoteAddress: "127.0.0.1:56673",
      static: false,
      trusted: false
    },
    protocols: {
      eth: {
        difficulty: 81,
        head: "0x1ec65dff0ef76ff041dfb488472391fec1eba1b0d46d2729a48eb9ef4e2eb488",
        version: 66
      },
      snap: {
        version: 1
      }
    }
}]
可以看出已经包含另外两个节点的信息了,其他两个节点上执行后信息类似,也包含另外两个节点的信息,这里就不再展示。
3.2 通过配置文件添加静态节点
通过3.1手动添加的方法有个不方便之处就是每次重启节点后都得重新添加,很不方便。我们可以通过配置文件的方式添加节点。
首先在第一个节点的数据目录(我这边是E:\blockchain\node1\data)建立一个static-nodes.json文件,文件中将刚才三个节点的enode信息添加进去。文件内容如下:
[
    "enode://f1e9b03d491338338233755c5a6e65c35c5005b17e0d2edcd910b3bc306f4ea42e0a8a1ae03461bfada67d4e551d88095333f1245bc336e5d27f8e99d03276e8@127.0.0.1:30304?discport=0",
    "enode://5ed1c1c554bd27b3cf31f852d51b9030727768401edf2a8179ef12604377e25e73b1c4b3855686535abf806b3fae0f0108cfc7f59e45508e99da739fa0719ab6@127.0.0.1:30305?discport=0",
    "enode://6779b9fc0d8e6253b31a69d206a61f55ec9cb56cdfd1d01446225cc12d58e78809006fe78fa7f60c69a931d084482cded7c2922e1ee6cc790a0c40f69885fdfe@127.0.0.1:30303?discport=0"
]
接着将此文件分别复制到第二第三个节点的数据目录下。 完成之后重启三个节点,重启节点就是先停掉,再用上面的启动节点的命令启动。将三个节点都重新启动之后再用admin.peers进行验证。
4. 通过转账验证联盟链
接下来来我们通过转账来验证联盟链是否已经连通。
首先查看下各个节点的矿工账户地址,矿工账户默认的是第一个账户我们可以使用eth.coinbase命令进行查看。
> eth.coinbase
"0x7fdfd0bb4b9ca3d8dffb624fa6b457131c86e91d"
分别在三个节点上执行eth.getBalance(eth.accounts[0])查询账户余额,如下:
> eth.getBalance(eth.accounts[0])
9.04625697166532776746648320380374280103671755200316906558262375061821325312e+74

> eth.getBalance(eth.accounts[0])
1

> eth.getBalance(eth.accounts[0])
1
可以看出除了第一个节点的账户有余额,剩下两个节点的账户的余额只有1wei,当然这是初始化时设置好的。接下来我们从第一个节点的第一个账户给第二个节点的第一个账户转账,在第一个节点控制台执行如下操作:
eth.sendTransaction({from: eth.coinbase, to: '0x87f0bdf019b52cafcfc6f5932d8e75ea62838a26', value: 10})
执行结果如下:
> eth.sendTransaction({from: eth.coinbase, to: '0x87f0bdf019b52cafcfc6f5932d8e75ea62838a26', value: 10})
WARN [03-02|09:48:31.864] Caller gas above allowance, capping      requested=4,290,772,993 cap=50,000,000
WARN [03-02|09:48:31.872] Served eth_sendTransaction               reqid=17 duration=8.2262ms err="authentication needed: password or unlock"
Error: authentication needed: password or unlock
        at web3.js:6365:37(47)
        at send (web3.js:5099:62(35))
        at <eval>:1:20(11)
提示我们账户没有解锁,为了接下来操作方便我们分别在三个控制台执行personal.unlockAccount(eth.accounts[0],"1234567",0)三个节点的第一个账户进行解锁,这里的1234567是密码,最后一个参数0是解锁时长,以秒为单位,默认是30秒,当输入0时只要控制台没关掉账户就不会锁定,如下:
GoError: Error: account unlock with HTTP access is forbidden at web3.js:6365:37(47)
        at github.com/ethereum/go-ethereum/internal/jsre.MakeCallback.func1 (native)
        at <eval>:1:24(6)
出现了以上错误这是因为出于安全考虑,最新版的geth默认禁止了HTTP通道解锁账户,我们需要在启动节点的时候加入--allow-insecure-unlock参数选项,所以我们需要先关闭节点加入选项重新启动,加入选项后完整的命令如下:
节点1:
geth --datadir ./data --networkid 1258 --port 30303 --http --http.port 8545 --http.api personal,eth,net,web3 --http.corsdomain "*" --syncmode "full" --nodiscover --allow-insecure-unlock console
节点2:
geth --datadir ./data --networkid 1258 --port 30304 --http --http.port 8546 --http.api personal,eth,net,web3 --http.corsdomain "*" --syncmode "full" --nodiscover --ipcdisable --allow-insecure-unlock console
节点3:
geth --datadir ./data --networkid 1258 --port 30305 --http --http.port 8547 --http.api personal,eth,net,web3 --http.corsdomain "*" --syncmode "full" --nodiscover --ipcdisable --allow-insecure-unlock console
重新启动完成后,再次解锁账户,成功后的输入如下:
> personal.unlockAccount(eth.accounts[0],"1234567",0)
true
解锁成功后我们再次执行转账:
> eth.sendTransaction({from: eth.coinbase, to: '0x87f0bdf019b52cafcfc6f5932d8e75ea62838a26', value: 10})
WARN [03-02|09:53:46.745] Caller gas above allowance, capping      requested=4,290,772,993 cap=50,000,000
INFO [03-02|09:53:46.750] Setting new local account                address=0x7FDfD0Bb4b9CA3D8DffB624FA6B457131C86E91D
INFO [03-02|09:53:46.756] Submitted transaction                    hash=0x171eb0477e29a8ee7b434d6bb27ed78aa5fefddb9e813a49de441336bfd2432b from=0x7FDfD0Bb4b9CA3D8DffB624FA6B457131C86E91D nonce=0 recipient=0x87f0bDf019B52CafCfC6f5932d8E75ea62838A26 value=10
"0x171eb0477e29a8ee7b434d6bb27ed78aa5fefddb9e813a49de441336bfd2432b"
可以看出已经提交了转账记录,我们再在第二个节点查询一下余额:
> eth.getBalance(eth.accounts[0])
1
可以看出余额并未增加,这是因为我们没有启动矿工,交易虽然提交了但是没有矿工处理,我们在三个节点上分别执行miner.start()启动矿工:
> miner.start()
INFO [03-02|09:56:35.903] Updated mining threads                   threads=12
INFO [03-02|09:56:35.909] Transaction pool price threshold updated price=1,000,000,000
nuINlFlO
[0> 3-02|09:56:35.915] Commit new sealing work                  number=1 sealhash=902ac8..62bedf uncles=0 txs=0 gas=0 fees=0 elapsed=0s
WARN [03-02|09:56:35.915] Block sealing failed                     err="sealing paused while waiting for transactions"
INFO [03-02|09:56:35.932] Commit new sealing work                  number=1 sealhash=902ac8..62bedf uncles=0 txs=0 gas=0 fees=0 elapsed=17.172ms
再次查询第二个节点上的账户余额:
> eth.getBalance(eth.accounts[0])
11
ps:这里有一个奇怪的现象无法理解,按照POA共识的逻辑3个节点有2个节点挖矿即可确认交易,但是我启动2个节点并无法确认交易,所以这里启动了三个节点的矿工,但是当第一次交易成功之后,停止其中一个节点的矿工(确定是停止了,已经重启过节点),再次交易时两个节点又可以确认交易了。
可以看出转账已经成功。至此联盟链已经搭建和验证成功。